Preamble
At the time of writing, Obsidian.md is at version 0.12.10, meaning the content of this article might not be correct when breaking changes are made to how third party plugins are created.
Obsidian.md overview
Last week I decided to take a look at creating a plugin for the newish markdown and "knowledge base" editor Obsidian.md.
Obsidian.md is something I have been using for the last 6 months or so for day to day note-taking and organising my thoughts.
At its core, Obsidian.md is an enhanced markdown editor, with great features around linking notes together. Links generally point to individual pages, which detail a particular topic.
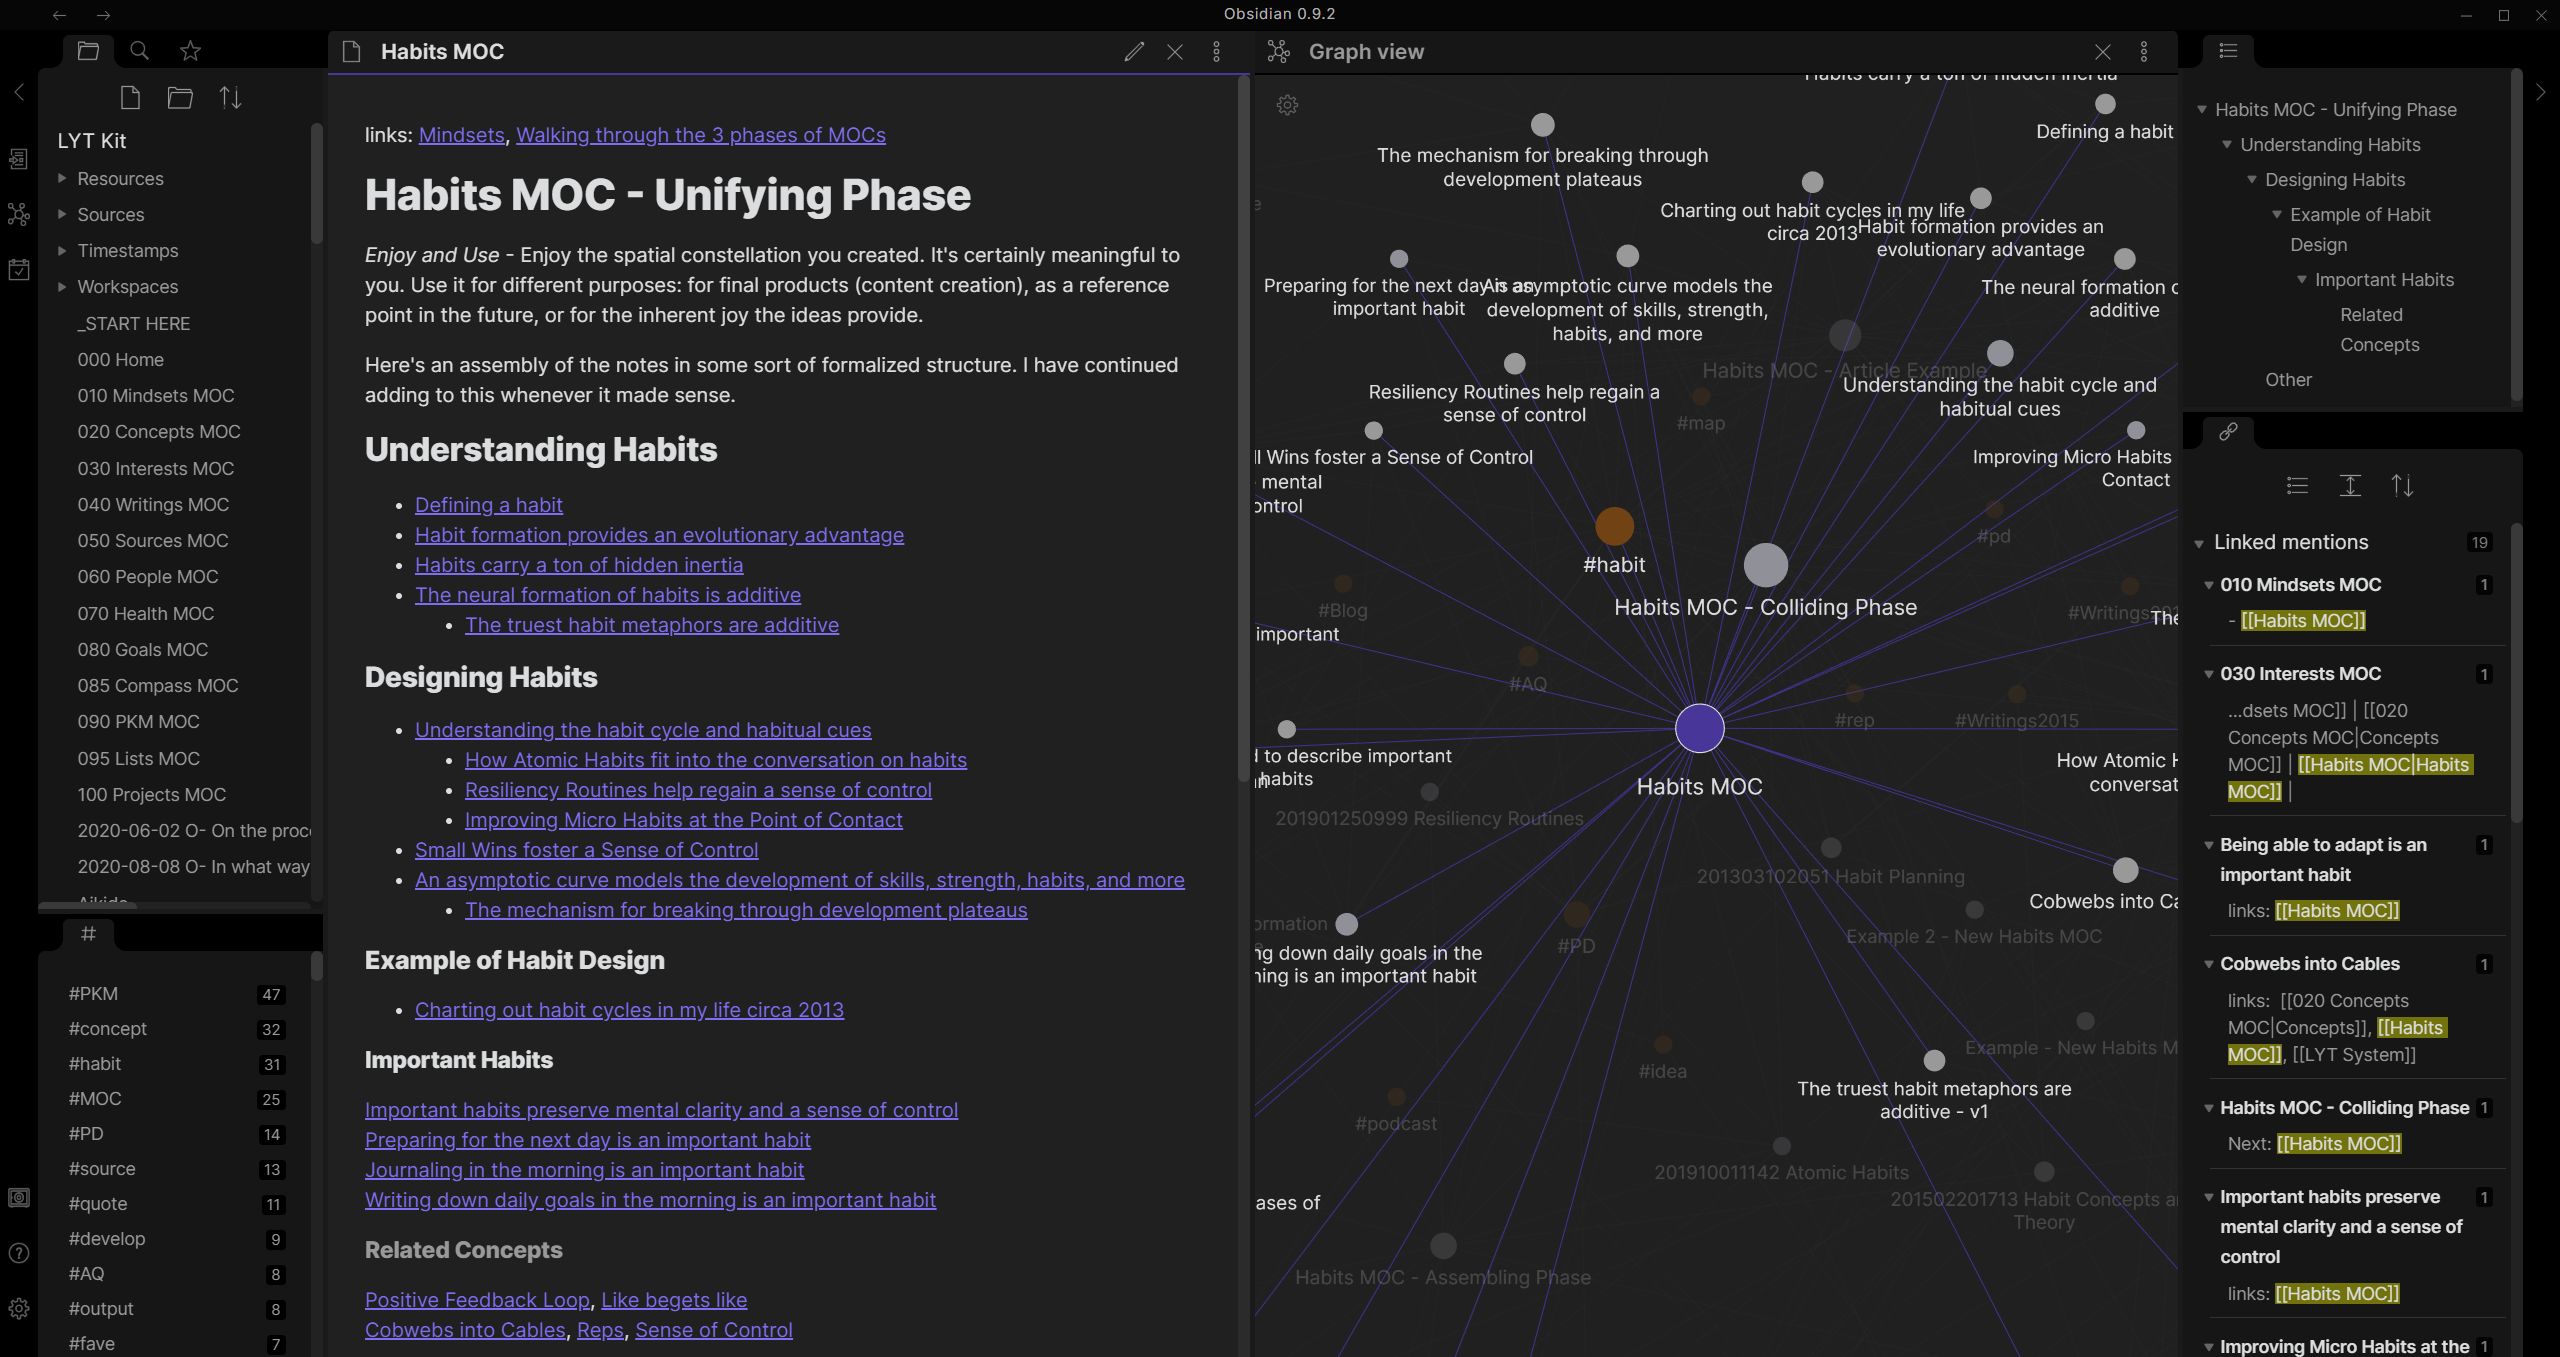
For example, in my work "notes vault" (what Obsidian.md calls a collection of notes), I have a note titled "Project Improvements". Project Improvements holds all the details around improvements I would like to make on the project I am working on. The Project Improvements note links to other notes containing details for other topics, and also has other notes linking to it, creating a graph of notes.

Credit: Obsidian.md official website
Obsidian.md has strong support for visualising the graph that gets created from all these links. For instance on a single note you can see the "local graph" for the current note, visualising only links between the current note and other notes. There is also the "global graph", giving you a broader overview of how everything links together.
I like having a library of "knowledge" notes, which contain details of topics, people, teams, issues I'm facing and so on, as well as a separate "day to day" collection of notes. Day to day notes generally contain details about meetings I have been in, comments from people, discussions and links to the knowledge notes. These document what is going on, and the detail notes document the details of standalone topics.
I really like this way of working, as the graph clearly highlights where specific topics are discussed.
The problem
One thing I was lacking in my workflow was macros, letting me input repetitive patterns for day to day notes quickly and easily.
A specific example of why this would be useful for me is when I take part in refinement meetings for tickets our team is planning. During the meeting several tickets get discussed as you would expect. I was regularly documenting ticket numbers for notes on these refinement meetings. As we use Jira, the ticket URL pattern is predictable, and being able to create links automatically without needing to look up the full URL every time would be fantastic. Manually looking up the URL was wasting time, and I would either have to miss details as I did so during the meeting, or I would have to spend more time afterwards tidying up my notes.
What would be ideal would be to only input a Jira ticket number, and have Obsidian.md autofill the link for me...
Obsidian.md plugins
Obsidian.md has a set of core plugins which are available by default, but there are also community plugins available.
Obsidian.md is an electron app, and their plugin interface makes it very easy to create new plugins using web technology, so that is exactly what I decided to do to add the missing functionality I wanted.
Creating an Obsidian.md plugin
The first challenge was working out how to add a skeleton plugin to Obsidian.md. There isn't a lot of documentation around this, as Obsidian.md is still in beta. There is however a sample plugin using the core interfaces that Obsidian.md exposes, which is what I based my plugin on.
It turns out all you need to do to get started is extend the Plugin class,
do your business inside the lifecycle methods onload and onunload inside
a file named "main.js", and the job is mostly done!
// main.ts

export default class MacroPlugin extends Plugin {
  onLoad() {
    // Add a settings tab for our new plugin. Not strictly
    // necessary, but gives a nice area for configuring
    // global settings and giving the user an introduction
    // to your plugin.
    this.addSettingTab(new Settings(this.app, this));

    // Register some commands which can be opened
    // with Obsidian.md's command palette
    this.addCommand({
      id: 'commandId',
      name: 'Some Awesome Command',
      callback: () => {
          // Do stuff when it gets executed
      },
    });
  }

  onunload() {
    // Cleanup resources you've created
  }
}
Once you've got the basics in place, the code needs to be placed inside your plugin's folder inside an obsidian vault.
.obsidian/
|- plugins
|  |- obsidian-macros
|  |  |- main.js
|  |  |- manifest.json
The manifest.json file contains metadata signalling to Obsidian.md properties about your plugin
such as the title, who the author is and so on. Refer to the sample plugin for more detail.
I used a secondary plugin for development purposes which allows hot reloading of Obsidian.md plugins when changes get detected, aptly named hot-reload. Without this, you will need to manually restart Obsidian.md every time you make a change to your plugin's code.
The macro plugin implementation
Now that I knew how to add a plugin, I could move onto the macro plugin implementation.
Feature: Macros for common use cases
As a software developer
I want to automate common inputs into my Obsidian.md vault
So that I can be more efficient at note taking

  Scenario: Team refinement meeting
  Given I am in a refinement meeting
  And I am using Obsidian.md for taking notes
  Then I can create links to the ticket using just the ticket number
I went for a simple variable replacement macro plugin, transforming things like this:
https:/{ myTicketNumber }
into this:
https:/PROJECT-1234
By entering "PROJECT-1234" into a GUI field corresponding to the variable "myTicketNumber", I would be able to generate the Jira links I wanted (or any other kind of string containing variables).
I would need GUIs for managing and editing macros, as well as an interface for applying them inside the markdown editor.
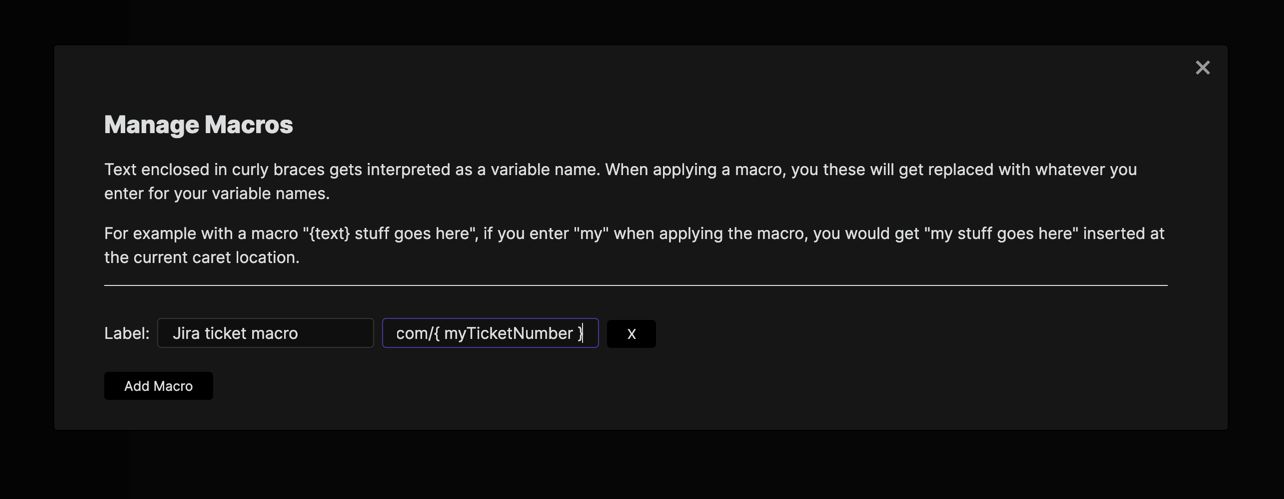
Management GUI
This part of the plugin was the simplest to create. I could use the builtin Modal class
provided by Obsidian to display the list of editable macros. All that was needed here was to
link up a command called "Manage Macros" to a modal window instance.
class ManageMacroModal extends Modal {
  plugin: MacroPlugin;

  constructor(app: App, plugin: MacroPlugin) {
    super(app);
    this.plugin = plugin;
  }

  onOpen() {
    ReactDOM.render(
      React.createElement(
        Provider,
        { store },
        React.createElement(MacroManageModal)
      ),
      this.contentEl
    );
  }

  onClose() {
    const { contentEl } = this;
    ReactDOM.unmountComponentAtNode(contentEl);
    contentEl.empty();
  }
}
The Obsidian.md Modal class handles resource management, meaning it'll clean itself up
when it needs to, will have a close button added to the top right etc. Beyond this I also chose
to use React for rendering the components, giving me fine control of the dynamic inputs I wanted.
The Obsidian.md imperative API is fine for managing mostly static lists of controls, but the
management interface would need to dynamically add/remove elements, pre-populate values in the list
and so on, something React is perfect for.
I also chose to utilise redux for managing application state inside the plugin. The store would persist across components being mounted/unmounted in react. The only difference between this plugin and a typical react/redux application is that the redux store outlives any react components. React components only get mounted when one of the two commands for managing or applying macros gets used.

I ended up with this interface, a simple list populated with all the macros saved inside an Obsidian.md vault. Each macro has a label and macro string.
Application GUI
For actually applying the macros, I needed a second GUI component which gets rendered only when inside a markdown editor window. This part was quite a bit more involved, and required some digging around in the Obsidian.md source code to work out how to access different classes I needed.
Step one was working out how to open the macro-application GUI only when within an editor window.
This part actually took me a long time to work out, but ended up being something that Obsidian.md
provides by default. I used editorCheckCallback, rather than the simple callback method
I showed earlier in the Creating an Obsidian.md plugin section.
I worked this out by looking at the type definitions for Obsidian.md and found the following comment for editorCheckCallback:
A command callback that is only triggered when the user is in an editor. Overrides editorCallback, callback and checkCallback
The code looks like this:
this.addCommand({
  id: 'apply-macro',
  name: 'Apply Macro',
  editorCheckCallback: (checking: boolean) => {
    // Open the macro-application GUI
  }
});
This callback will not be triggered if you are focused within a markdown preview window for example.
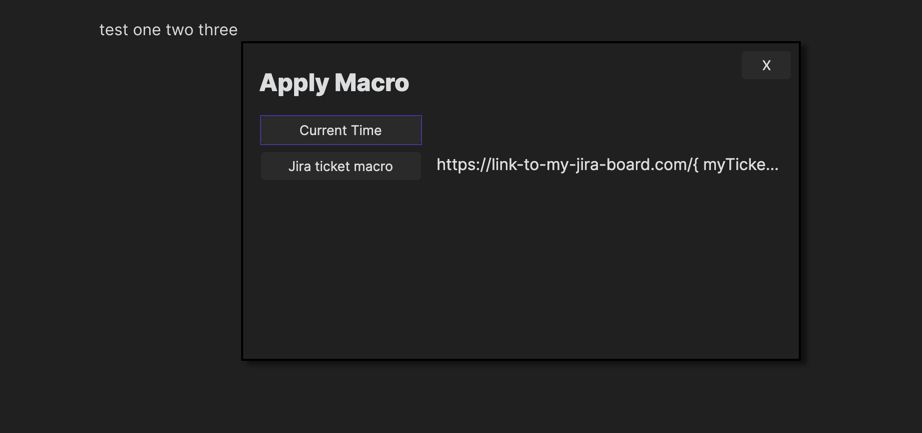
Step two was working out how to render a component near the editor's cursor.
There didn't seem to be any builtin components for this task. I could have used a Modal instance for
this task again, but wanted the user to be able to see the context in where the macro would be applied.
To achieve this, I went with some vanilla
JavaScript, making use of popper for managing the positioning of the popover. I actually used
react-popper for bindings to popper in React exposing some react hooks.
popper requires a reference element. The coordinates and styles it subsequently gives you are then relative to this element, with any offsets you specify applied too. I needed to use an element that is near the editor's cursor.
Obsidian.md uses CodeMirror as its text editor of choice, rather than any manual implementation using textareas for example. CodeMirror has a html element for the cursor, so if I could access this, then my popover positioning would be handled perfectly by popper.
I essentially wanted my code to look like this:
const { styles, attributes } = usePopper(cursorElement, popperElement);
One problem I spent a while debugging was how to access the CodeMirror instance for the currently active editor window. Obsidian.md supports multiple open windows concurrently, each of which has its own CodeMirror instance. If I didn't use the instance corresponding to the active panel, then I might accidentally end up opening the popover in an inactive window.
Unfortunately this is a part of the implementation that I couldn't find a clean "officially supported"
interface for. Obsidian.md provides an interface as a layer on top of CodeMirror called Editor, with
this documentation:
A common interface that bridges the gap between CodeMirror 5 and CodeMirror 6.
It provides most of the text manipulation interfaces that exist in CodeMirror, but does not provide access to the view information such as the elements used by CodeMirror. I ended up having to access the real instance of the CodeMirror rather than the Obsidian.md proxied one, to be able to access the input cursor.
const activeLeaf = this.app.workspace.activeLeaf as any;
const codeMirror = activeLeaf.view.currentMode.cmEditor;
This code accesses the active window's CodeMirror instance. The main problem is that this is more likely to break as it's not an official Obsidian.md interface. If the properties available on editor leaves changes, this will break. If view information is made available later on by Obsidian.md, then I will make attemps to use these instead.
Now that I have access to the cursor's html element inside the active editor, the rest of the implementation is fairly straightforward React and JavaScript. The code uses common functions for detecting variables inside macro strings, creating inputs for each uniquely named variable. Application of the macro as a string is also quite straightforward using an official Obsidian.md interface this time:
// Method I added inside my plugin class
applyMacro(resolvedMacro: string) {
  const markdownView = this.app.workspace.activeLeaf.view as MarkdownView;
  markdownView.editor.replaceSelection(resolvedMacro);
}
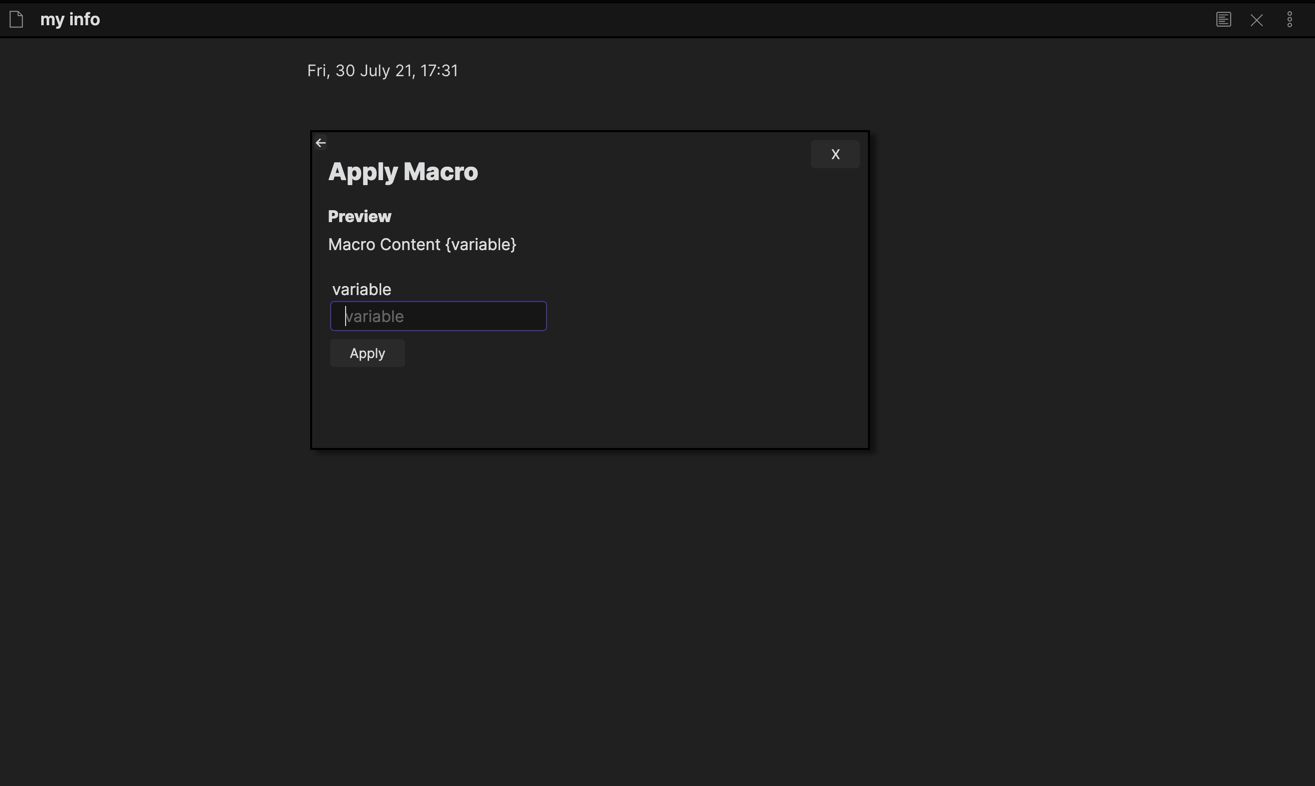
Putting the steps together, I ended up with this:

Full disclosure: there are still a couple of bugs needing to be ironed out around when the popover closes. For example if a new command gets executed using keyboard shortcuts while the popover is open, the popover does not close as it should.
Managing state
This part was straightforward. I decided to use redux as it's my go-to state management library. The store gets created in the same way as you would in any application. I also used Redux toolkit to reduce boilerplate.
const store = configureStore({
  reducer: {
    macro,
    ui,
    builtins,
  },
});
The store gets injected into the React components using the Provider component when the GUIs
get opened via Obsidian.md commands:
ReactDOM.render(
  React.createElement(
    Provider,
    { store },
    React.createElement(MacroManageModal)
  ),
  this.contentEl
);
The store also needs to be linked up with Obsidian.md. It needs to get hydrated with persisted plugin storage on plugin startup, and any changes need to get persisted to Obsidian.md storage when redux state changes. The plugin wouldn't be much use if you couldn't persist and load your configured macros!
Obsidian.md provides some methods for saving/loading plugin state as json, loadData and saveData,
so I just needed to link these up.
Initialising state from Obsidian.md storage:
// Loading data on startup
onload() {
  const settings = await this.loadData();
  store.dispatch(rehydrate(settingsState));
}
Saving state to obsidian data store (json file) when redux state changes:
import { debounce } from 'obsidian';

// Inside my plugin class
// "subscribeToStore" gets called
// once during plugin startup in `onload`
subscribeToStore() {
  let promise = Promise.resolve();
  // Create a debounced function to save
  // settings. Any subsequent updates happening
  // before 1000ms has elapsed, will cancel pending
  // updates.
  const updateSettings = debounce(
    (settings: PluginSettings) => {
      promise = promise.then(() => {
        return this.saveData(settings);
      });
    },
    1000,
    true
  );

  // observeStore is a helper which calls the
  // given callback `updateSettings` when the
  // result of the selector (first argument)
  // changes.
  this.storeUnsubscribe = observeStore(
    (state) => ({
      macros: getMacros(state),
      builtins: getBuiltins(state),
    }),
    updateSettings
  );
}
Summary
I ended up with a simple plugin which works for my use case quite nicely!
I have made the full source code for obsidian-macros available on GitHub.

